I love to cook, to experiment with what is growing in my garden and to collect wildfare. I want to share with you my ideas for preparing food with colour, texture and delicious flavours.
Since daylight saving has finished, suddenly the nights in the south seem to be colder and the leaves of the trees are thinking about changing colour. My lettuce plants are under threat with a frosty night just around the corner. Best use them while I can. The sun is shining and that’s always the best time to eat a salad.
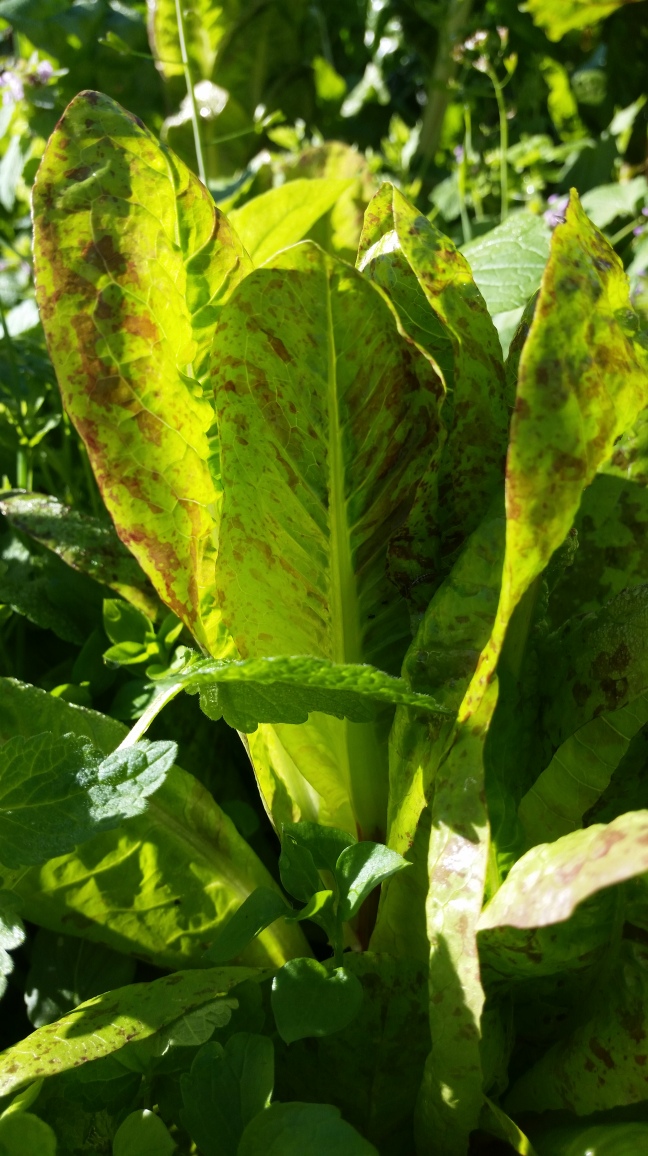
The last of my Freckles cos type lettuce plants
I gather my autumn salad from the garden. I have two varieties growing an iceberg in the green house and a cos type lettuce with speckles in my garden where nearby the Florence fennel is about to bolt. Remarkably my slow tomatoes are still ripening in the greenhouse along with the basil that is just holding on and is probably protected a little by the chickweed growing over it.
This is chickweed in flower shrouding the last of my basil, I chose some chickweed that was all leaf as these leaves are juicier than those plants putting effort into flowering.
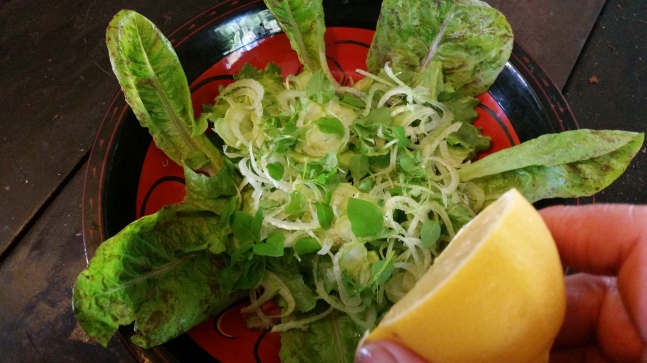
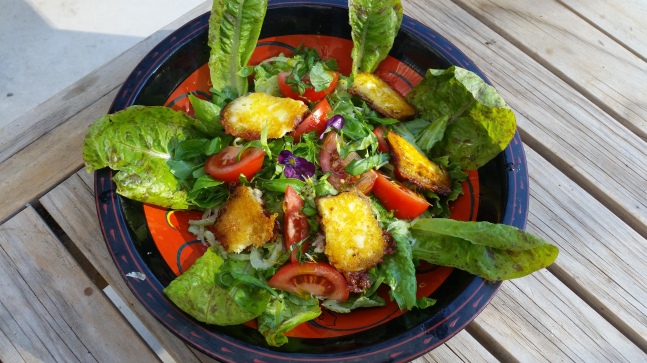
Autumn Salad
When I make a salad I try to always add herbs, flowers, weeds and a protein of some kind.
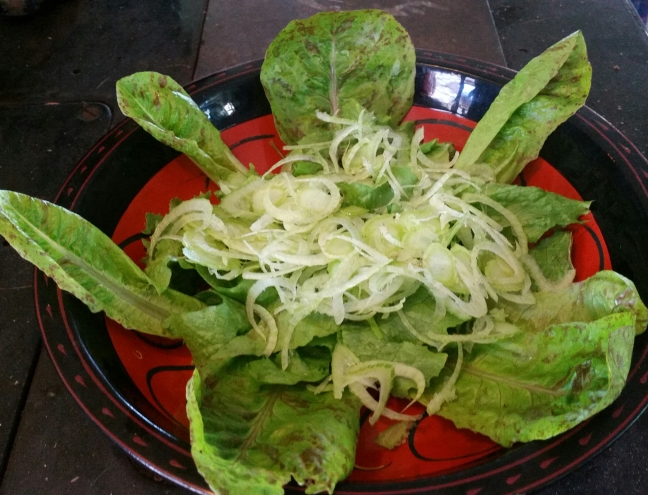
First I tore the Iceberg leaves (while other lettuce types add colour and different textures I really enjoy the crunch of the Iceberg and next year will grow more.)
The speckled lettuce with its long leaves I put around the edge of the bowl whole.
I shaved the Florence Fennel bulb with a mandolin because the thinner you slice it the better it tastes and adds a crunch as well as a natural aniseed sweetness.
Now I pluck off the leaves of the thready chickweed. I try not to include too much of the stringy stems that can be a bit chewy. Chickweed was once used like we use lettuce and contains many nutrients. If you are interested in learning about other weeds click on this link:
The easiest and best dressing for me is a squeeze of lemon juice and avocado oil. I decide to squeeze the lemon juice on now before I place the final toppings. I also add a little salt and pepper. The oil I put on last.
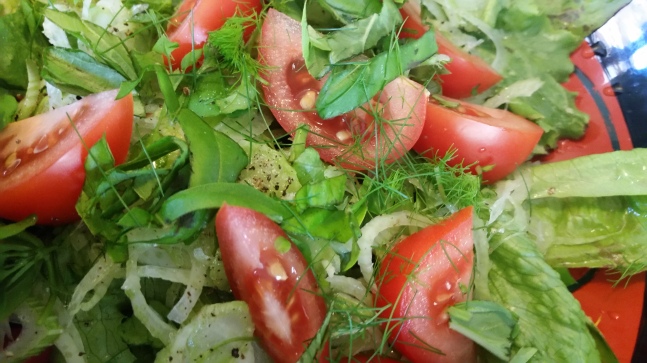
I slice up a tomato into 8 and this adds colour to the green.
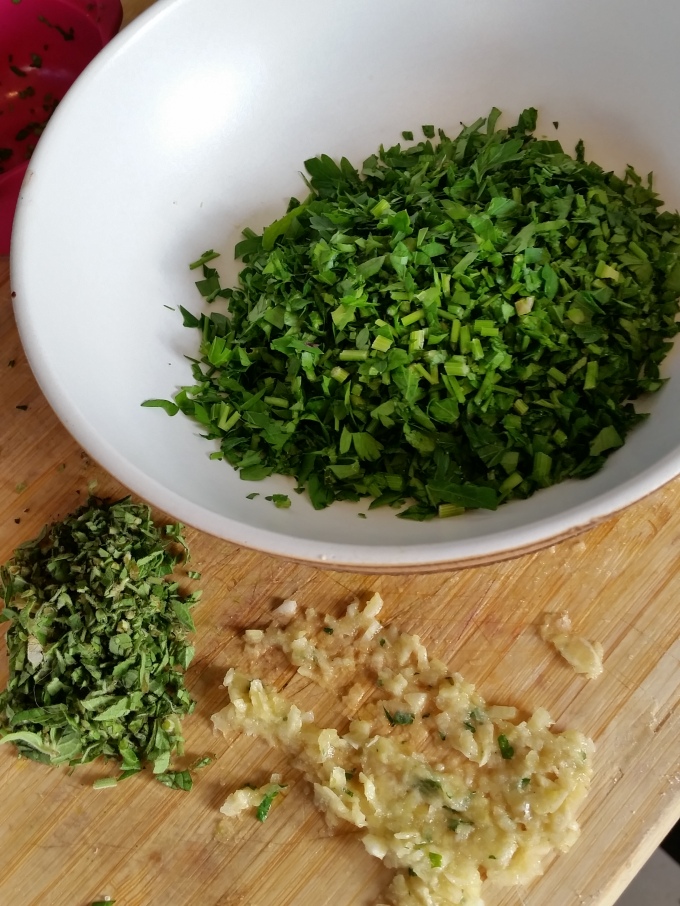
Now I cut up a sprig of basil and a little of the fennel fronds.
I used violas and petals from a dandelion as the flower element for this salad.
The protein I chose is one of my favourites the salty and soft hulomi cheese that when fried in a pan for a few minutes in avocado oil becomes crunchy on the outside. Over this I sprinkled a little avocado oil and I had a delicious salad to enjoy while I sat in the sun.
You can choose other options and combinations like replace the fennel for thinly sliced courgette, replace the tomatoes for sliced pears with lemon juice to stop them turning brown and match the pears with cumin roasted walnuts. All these ingredients are autumnal produce.
Autumn Salad: lettuce, fennel bulb, tomatoes and Halloumi cheese.
When making a salad I think of sweet and tart, crunchy and soft, and colour combinations. It never ceases to amaze me how many things you can actually find in the garden to put into a salad, especially when you are confident on what weeds and flowers you can safely add to your salad.
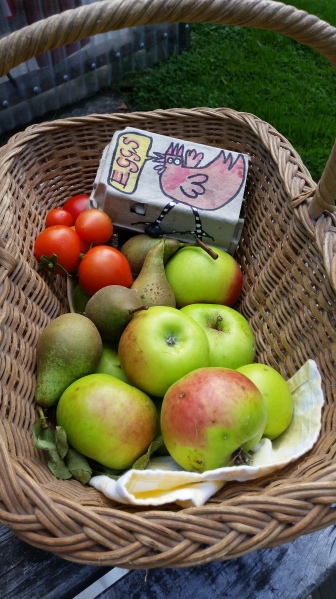
My sister Kerry is my Little Red Riding Hood often arriving with a basket of produce from her garden and hens.
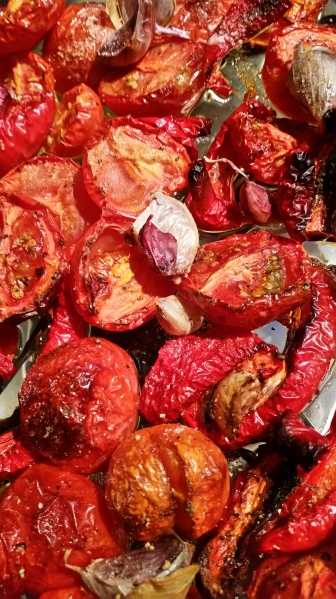
Included in Kerry’s basket were some tomatoes. In our family I’m credited as the one who is the creative cook and my sister as a creative artist. Kerry is reluctant to spend much time in the kitchen. Her rule is use fresh produce and make it easy and simple. Perhaps her signature dish that’s a real family favourite is her slow cooked tomatoes with pasta.
It’s an ideal recipe for the start of autumn when tomatoes are more appetising cooked than fresh as the nights become cooler. The secret to this recipe is to cook long and slow to caramelise and intensify the tomato flavours.
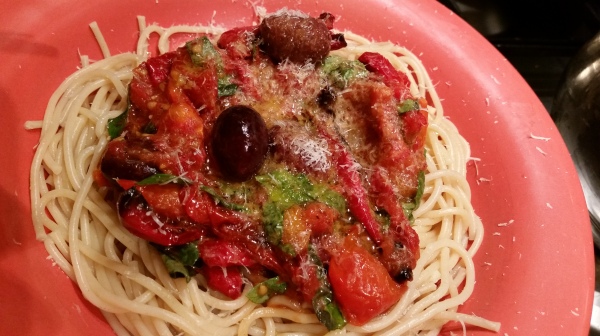
Slow Roasted Tomato Pasta Sauce
There are no measurements for this sauce, make as little or as much as you want. Red Peppers are certainly a great addition to this sauce when they are available at a good price.
Larger tomatoes cut into fat slices, smaller tomatoes in half or tiny cherry tomatoes just prick with a knife and cook whole. I love garlic so I would add one bulb of garlic by peeling off the cloves. No need to skin the garlic. Once the sauce is cooked, I simply squeeze out the garlic puree into the tomato and discard the skins. If you cook the garlic without their skin they could burn.
Season well with salt and pepper and generously add olive oil. You can use virgin olive oil because you are cooking these tomatoes at a low temperature. Cook at 140ºC for about an hour until the tomatoes have collapsed and have begun to caramelise.
To make it more sauce like but not like a puree smash the tomatoes with a potato masher.
The two final ingredients are olives and sweet basil.
I tend to add the olives into the mix to heat through in the sauce while the pasta is cooking and only add the basil when served.
A delicious and warming dinner when added to pasta and topped with a grating of parmesan cheese.
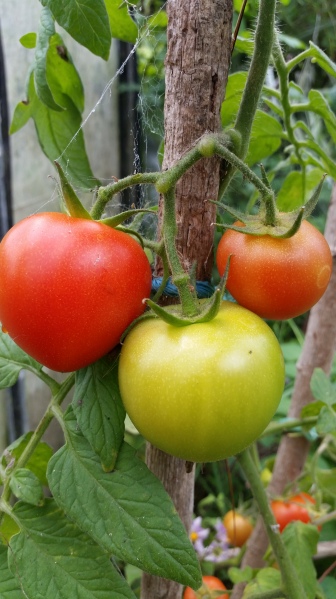
Thanks to the generosity of Gemma who previously owned this property we have been enjoying produce from the garden all summer.
These red potatoes were heavy croppers and some of them the size of four ordinary potatoes.Peas, coriander and the sweetest strawberries were all delights we enjoyed over December and January.
It is a true sign of a generous gardener to plant potatoes, peas courgette and tomatoes knowing you will not reap the harvest, especially when time is at a premium packing up and moving.
My tomatoes had a slow start with a cool beginning to summer and without a watering system in the glasshouse plus a few missing glass panes, I haven’t had the harvest I should have. But they are still producing and the basil has grown well. There is nothing quite the smell of basil and the sense of satisfaction to pick a fresh tomato off its vine.
Not sure what variety the tomatoes are – they are almost a heart shape and taste good.
Thank you Gemma.
Kerry’s gave me a Cat spirit who will protect Gertrude my glasshouse..unfortunately this cat spirit doesn’t scare white butterfly caterpillars that have eaten my kale.
Kerry has just opened ‘Seven’ a cute retro apartment in her cottage garden in MacAndrew Bay, Dunedin, and is listed on Airbnb. A great place to stay if you are ever visiting Dunedin. You too will experience the Red Riding Hood delivery of a basket of produce.
It's been months since I last wrote a posting...I've been just too busy with our change of lifestyle. In December we left Ponsonby for Portobello. Not only did we move from one end of New Zealand to the other, we moved from inner city living to 50 acres (20 hectares)
We love our bush clad piece of paradise on the edge of Portobello village, only 25 minutes drive out of Dunedin
It's always good to look into your pantry and come up with a meal without having to go shopping. While packing up in Auckland a timely Radio NZ National interview with Grace Rameriz gave me recipes that allowed me to utilise the cans of beans and rice I had squirrelled away in my pantry .
Grace promoting her colourful new cookbook "La Latina - A Cook's Journey Through Latin America" explained the cuisine of Latin America is all about big, fresh flavours - simplicity with not all the countries using chillies.
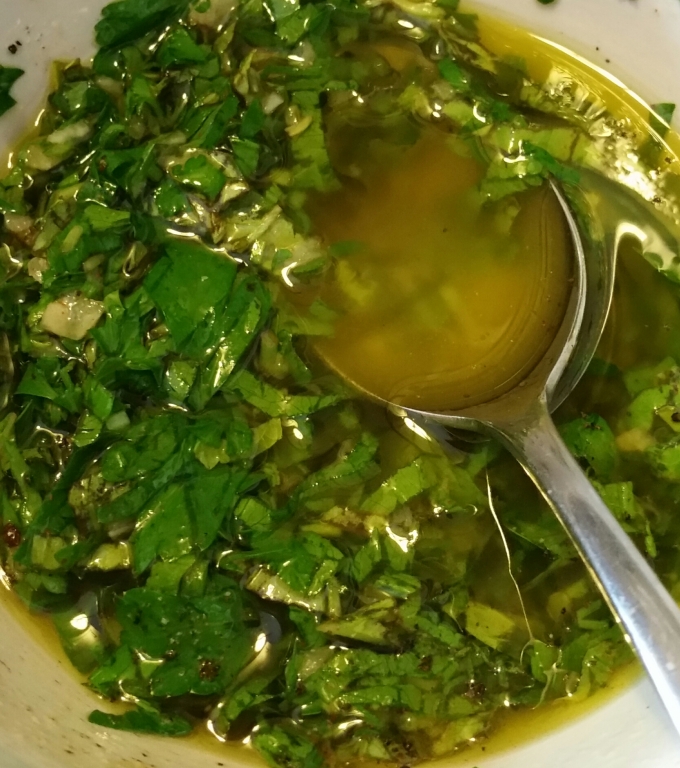
The Chimichurri herby salsa especially sparked my interest. This sauce is linked to the gauchos (cowboys) of Argentina.
Gauchos would cook over a wood fire with little more than salt and a few herbs to season their meat. There are many variations to this recipe in Argentina so it's a sauce you can treat as a base and add to or use however you like.
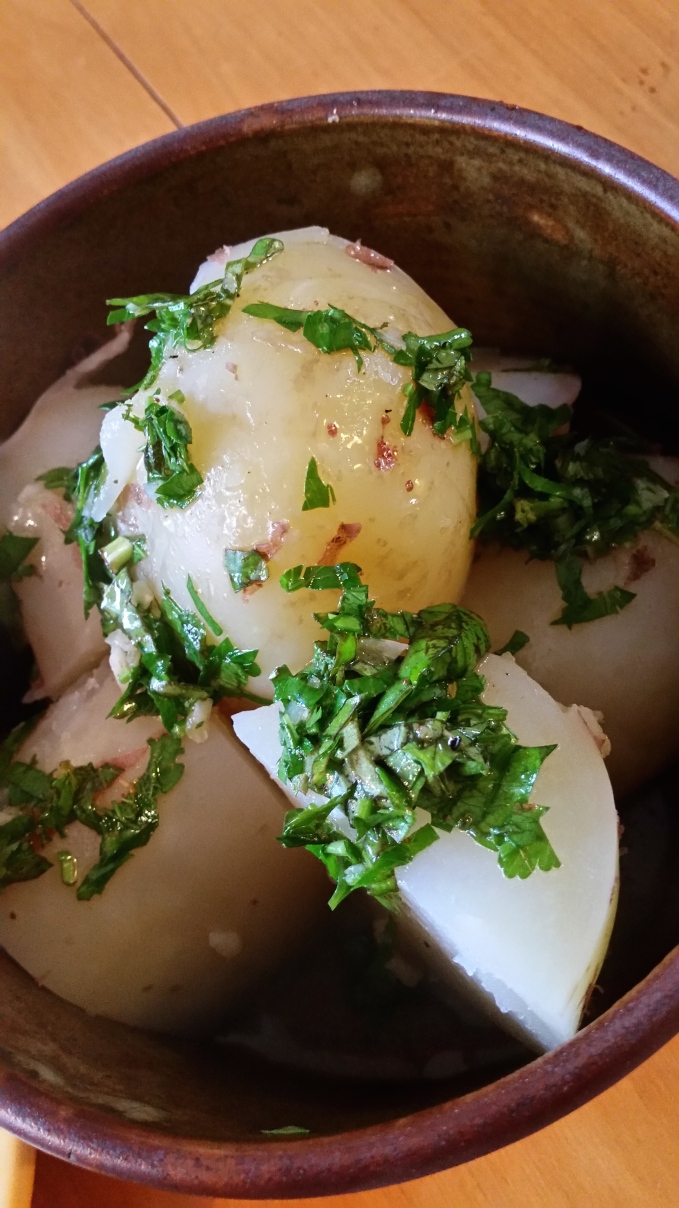
Traditionally Chimichurri Salsa is used to add flavour and freshness to proteins (chicken, beef, fish, pork) without overpowering them but I've also used it to add an extra zing to simple flavoured vegetables like boiled new potatoes or aubergine and zucchini.
2 cloves garlic, peeled and finely chopped and smashed with rock salt
1⁄2 tsp red chilli flakes
1⁄4 cup white vinegar (I prefer apple cider vinegar)
First of all I crush the garlic cloves in a little rock salt and this is the best way to make the garlic into a paste. Best done with a mortar and pestle...but then I often just use the blade of a knife to finely cut and then squash the garlic into the salt.
You can use whatever combination of herbs you like. With lamb I tend to use a mix of parsley and mint instead of the marjoram. Finely chop the herbs and then crush a little to extract the oils. Often dried oregano is used but I tend to use fresh.
You can also add ground cumin if you want that earthy flavour. Dried chillies or fresh add a punch.
Then simply stir in the oil and vinegar (twice the measure to the vinegar).Ideally let it sit for at least 30 minutes before using so that flavours will develop.
Our young gauchos Beau (left) and Alex (right) would probably prefer tomato sauce. So you can enjoy the chilli element and serve in a jug so that everyone can add just the amount of herby salsa they want. I have made it without the chilli and its still delicious.
I call it Gaucho Sauce because its memorable and evokes working and living outdoors. It's more of a sauce consistency than the chunky salsas we recognise in New Zealand, but then salsa in Spanish does mean sauce. Add some chopped tomatoes or peppers and it will be more chunky.
Peter and I have been spending long days working outside and having Gaucho Sauce on hand that can keep in the fridge for up to 5 days makes a simple meal a little bit special.
“No one is born a great cook, one learns by doing.” ― Julia Child
When I offered to take cooking lessons for Beau’s classmates in year zero (new entrants) at Ponsonby Primary, I was a little unsure just how it would go. I have been surprised to see how the children have loved the experience.
Best of mates – Francesca and Anna look like they could be a future Masterchef duo.
The hour long classes with groups of two or three have been my first go at teaching cooking. You could say I was diving into the deep end by starting with five year olds. But it has been such a delight. How gratifying it is to see young cooks in the making take such pleasure in making pikelets.
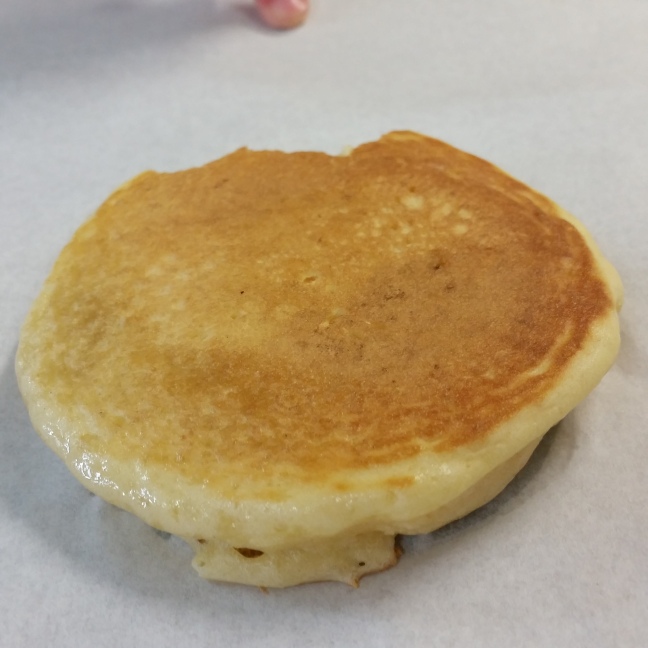
Noah’s pikelet was perfect.
I chose pikelets because they are quick, easy to make and it’s hard to fail. Most children know of or have helped make pancakes before. Pikelets belong to the world wide Pancake family and are Welsh by origin. In England they are called Drop Scones.
Nan’s Pikelets
Ingredients:
1 heaped cup of flour
1 tsp baking soda
2 tsp creme of tartar
pinch of salt
2 Tbsp sugar
1 egg
Milk to mix into a batter*
*Milk Kefir or buttermilk used instead of milk makes an even lighter pikelets.
Jasper and Mia know first thing to do when baking is to wash hands.
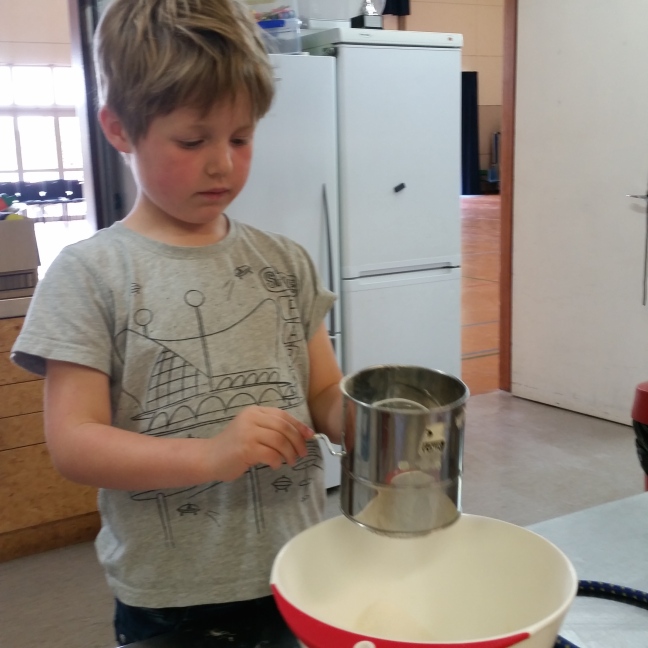
Next the flour, salt and raising agents (baking soda and creme of tartar) are sifted for two reasons: to mix thoroughly and to add air to make the pikelets light.
Jack S is doing a good job of getting air through the flour with his sifting action.
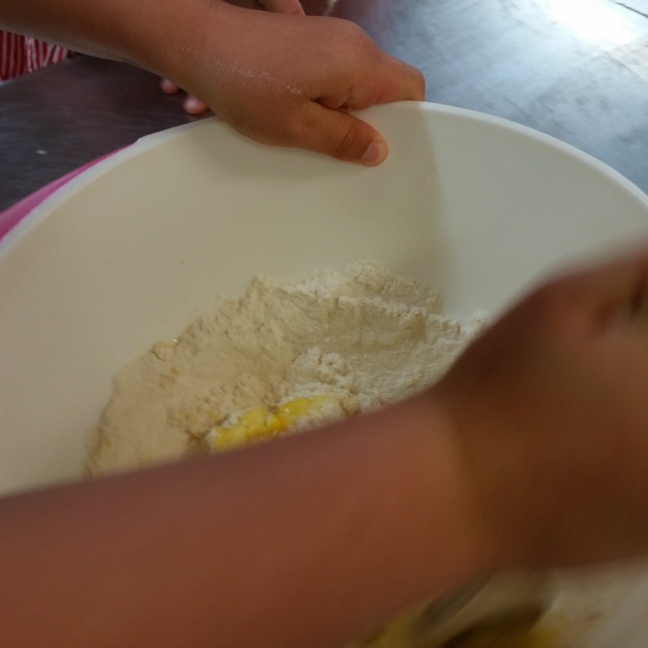
Add the sugar and mix through the sifted flour. Make an indentation or well in the flour and break in egg and about half a cup of milk and mix to a batter.
One child would hold the bowl and the other would have a go at stirring. This was to avoid disaster if the bowl and mix hit the floor. Then I would show how to beat holding the bowl in one arm and quickly whipping the batter using a wooden spoon to make a smooth silky batter telling them that this is how to mix once they get bigger.
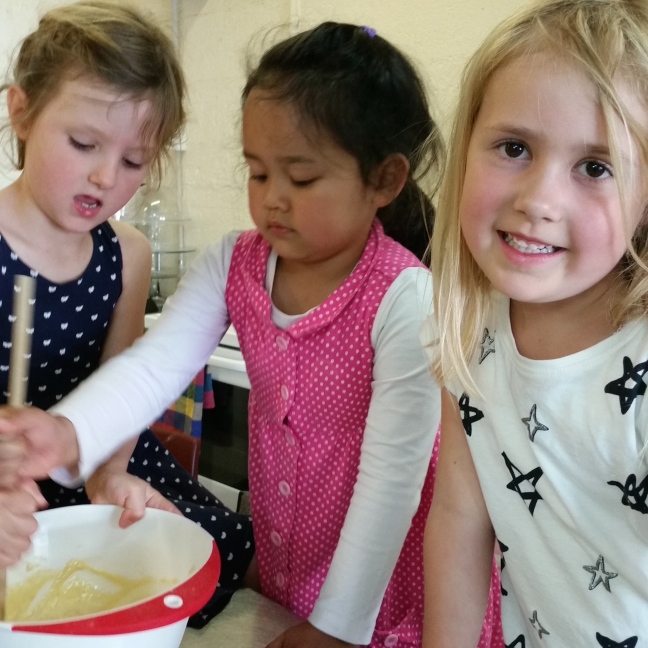
Lucia, Dre and Rebecca all take turns to beat the batter.
Add more milk if necessary to make a consistency that is not too thick as to stay on the spoon or too thin to spread too much in the pan.
Jack K, Noah and Beau (my grandson) were the first to make the pikelets.
The mix needs to sit for about 10 minutes until bubbles appear in the batter. While we wait for the mix to double I heat up pans. Getting the heat right is the most difficult part of the process.
Mia is doing a good job keeping the spoon over the centre of the cast iron pan.
It’s best to make pikelets on a cast iron griddle or girdle because its flat plate surface makes flipping a lot easier. Next best is a cast iron pan. Cast iron takes longer to reach heat than a steel pain but will produce a more even heat. The pan needs to be sprayed with oil or do it the old fashioned way of a little butter on butter paper and wiping around the pan.
A good pikelet has an even golden colour.
The first pickles we make is a tiny version to test whether the temperature is right.
Jasper got really good at making neat round pikelets.
You can cook a number of pikelets at once but I felt for our class we should concentrate on one at a time.
We wait until some of the bubbles begin to pop indicating that the mix is cooking and the bottom is browning. Time to flip….
Cormack experiencing the joy of a good pikelet flip.
I show them first time how to do it, help them flip the next, and then they get to flip on their own.
Blake guards his pikelets and is pretty proud of his achievement. His Mum Suzie in the background has been a great help and allowed me to take more children in one session.The best part…eating them – Cormack and Spencer
Lucia likes them plain but Rebecca likes raspberry jamHunter wonders if he will put jam on this one too.
Karishma’s really happy with the end result.
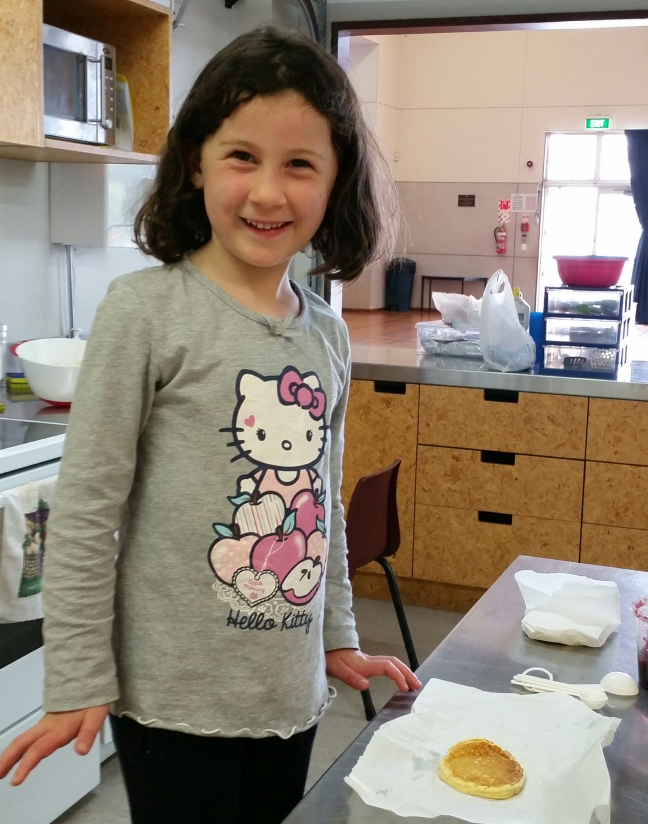
Julia is wrapping up one to take home.
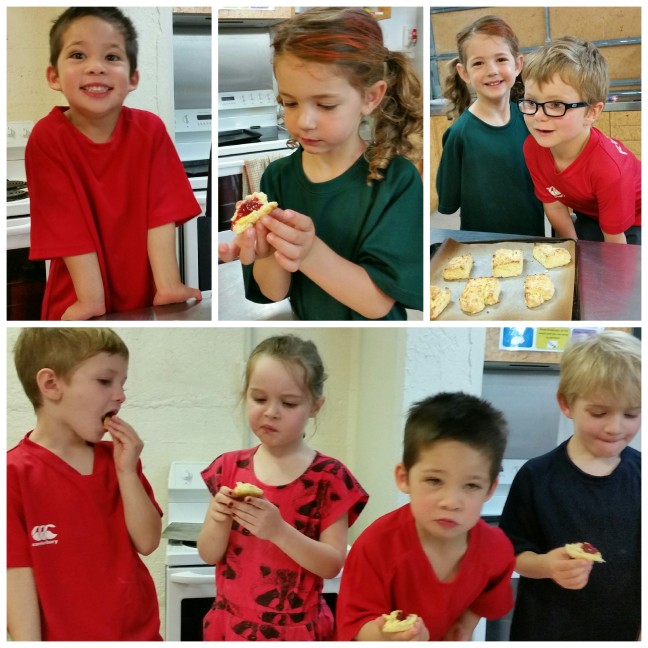
I found I was fast running out of time. It was decided that on the final Friday I would have six children and make scones for the whole class so they can enjoy sharing food with their classmates. I wanted them to experience that sharing is the most rewarding part of cooking. Scones are great for a large crowd and we made 36 scones with every child making 6 scones each.
Teacher Mrs Derry allows a sneaky snack break at around 10 for the year zeros. On Friday in Room 20 it was a special sneaky snack break with scones and jam made by their classmates.
Thankfully Susie offered to help and teaching assistant Miss Stevenson made the gluten free scones with Holly and Remy who have gluten allergies.
Miss Stevenson with Holly and Remy with their gluten free scones. Its not only the flour that needs to be gluten free so does the baking powder.
I had previously discounted making scones with the children because scones can too easily be overworked resulting in a tough, dry result. I would need to supervise the mixing closely but the rubbing in butter into flour would be fun for the children to experience.
First of all we did the grand hand wash and told them that if they touched their faces they would need to wash again especially because they were using their hands in the mix. Isn’t it always the way, if told not touch your face you suddenly get an itch? The more Jack and Luca thought about it the itchier their noses became. Suzie patiently would go through the washing hands process again and again but they all now know the importance of clean hands when preparing food.
Scones
(Makes 12 – preheat oven to 200ºC)
2 cups of flour (or a mix of 1½ white and ½ wholemeal)
4 levelled off teaspoons of Baking Powder
100 grams of butter
Pinch of salt
*Milk to mix to soft dough – approx 1 cup
Extra flour for patting out and cutting
*Milk Kefir makes fantastic scones as would buttermilk. As kefir is like yoghurt with a tart flavour I usually add 1 tsp of sugar to the flour if using kefir.
Luca was concentrating hard on the job of shifting the dry ingredients.
Once the flour, baking powder and salt has been sifted, its time to rub in the butter. This can be done in a food processor but I find the end result is better if done by hand.
Always use cold butter and dice the butter into 1-2 cm cubes.
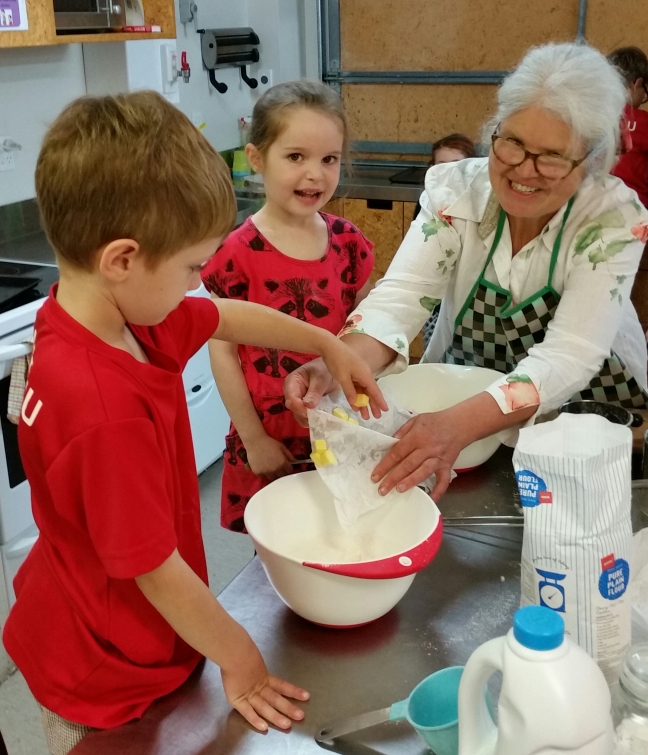
Boris and Olivia enjoyed the squishy squashy feeling of mixing the butter into the flour.
I tend to smear the cubes into the flour and then rub mix between fingers to reduce the butter to a breadcrumbs consistency. The children worked their bowls of butter and flour beautifully.
The messy part over, they all washed their hands ready for making the dough.
I showed them how to use a table knife to mix in the milk by cutting through the flour rather than stirring. I just pour the milk rather than measure it out. We mixed until all the flour could form a ball easily.
With scones the mix should be wet rather than dry (wetter than you would for pastry). A light covering of flour on the work surface will ensure they don’t stick.
No need to roll just lightly pat down the ball to about 2.5 cm in height and cut into 12 and place on a cold tray either sprinkled with flour or on a sheet of baking paper.
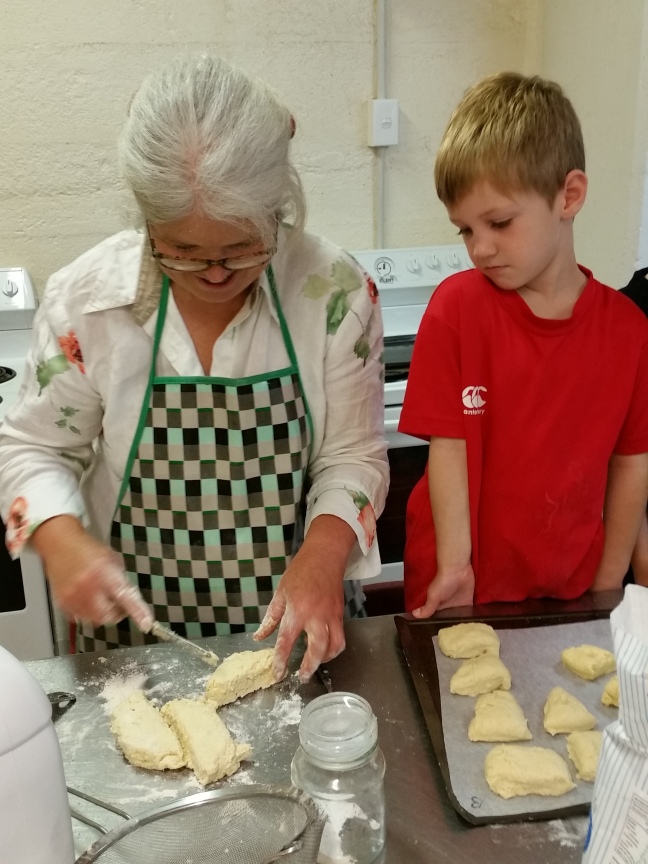
Boris watches me quickly cut the scones because sneaky snack time was fast approaching and we hadn’t got the scones in the oven yet.
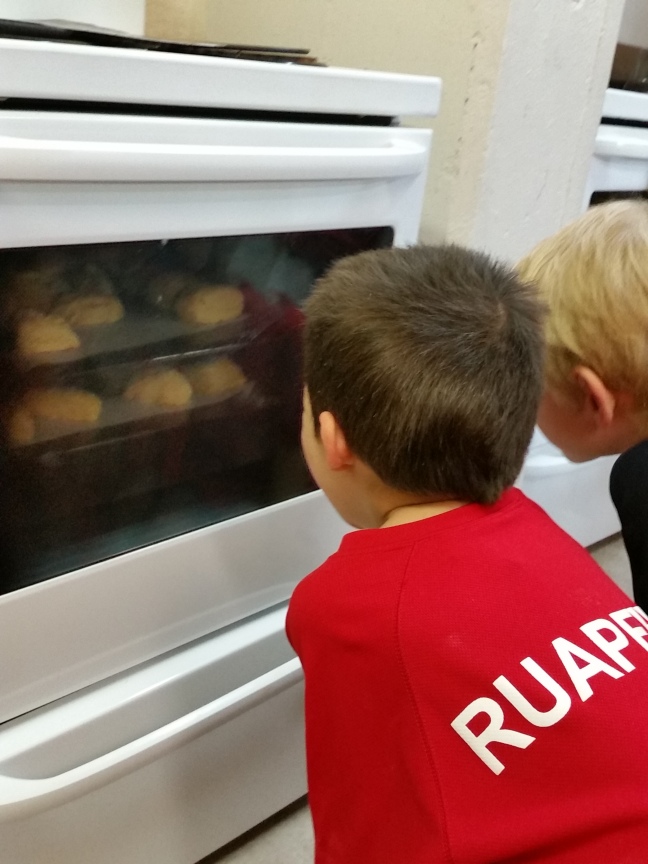
Bake for 10-12 minutes – the smell test is the best timer you can use. Once you smell them cooking they are usually cooked.
Luca and Jack watch the scones rise and cook.
Out of the oven, the next job was to put butter and jam on the scones to share with the class.
I love this photo of Remy… that first bite into a warm scone with raspberry jam…yum!
One thing these classes have taught me is not to underestimate what children can do on their own. My final group of six certainly made great scones and we wrapped up one of their own scones for home.
Boris, Olivia, Luca, Jack, Holly and Remy all chanting “Scones”.
Children introduced to the enjoyment of cooking something for themselves and their friends will create good food memories that hopefully will inspire them to be creative in their future kitchens.


 I shaved the Florence Fennel bulb with a mandolin because the thinner you slice it the better it tastes and adds a crunch as well as a natural aniseed sweetness.
 Now I pluck off the leaves of the thready chickweed. I try not to include too much of the stringy stems that can be a bit chewy. Chickweed was once used like we use lettuce and contains many nutrients. If you are interested in learning about other weeds click on this link: