Friday, 25 January 2013

Cooking Corn Waimarama Style

I was welcomed to Hawkes Bay by the waving green fields of sweetcorn.  During our stay in the Bay I discovered the very best way to cook corn from Peter's old mate Fred Hardy.
I love the colours of the beehives near Waimarama, Hawkes Bay
We were invited to lunch on a perfect day at Fred and Chris's bach at Waimarama Beach about  a 20 minute drive past vineyards and olive farms south of Havelock North.
View down to Waimarama Beach - a very dry season 

We sat under an umbrella around a magnificient round totara table and talked about the locally grown corn we were going to have for lunch.  Fred is a born communicator and wasn't at all phased by the camera when I asked him if I could video the process. 

Chris has a real eye for colour and design.  She has made their
simple 1960's bach look a picture with the use of colour and planting that
showy red Bougainvillea that we don't have a hope of growing down south.
Chris is just as much a foodie as Fred. Here's how she made this easy and delicious cream cheese spread that we put on crackers as a starter.

Chris's cream cheese spread - easy to whip up for unexpected guests
 if you have a spare cream cheese in your fridge and you can use any pickle but the lime was perfect. 
Cut in half a cream cheese, sandwich the two halves with lime pickle (homemade by Chris - must get that recipe) and top with a good coating of a dukkah of your choice.  To keep the dukkah in place lightly pour olive oil on top and serve with your favourite cracker.   Chris served it with plain rice crackers and it was so tempting to have more than you should.

Now onto Fred's method of cooking corn on the barbeque in a way that keeps all the flavour and the kernals plump and juicy.    It's simple but you need to prepare ahead of time.

Step 1:   Cut off the silky end of the corn. Find a large bucket and hold a running hose over the end you have just cut.   You can feel the corn husk being filled with water.  Place the corn in bucket with water.

The hose has to be pushed hard against the trimmed top of  the corn and your hand
 makes a seal to ensure the corn husk is being plumped up with water
Step 2:  You need to soak the corn for at least an hour before cooking and to keep them submerged put a weight on top.
This terracotta saucer is ideal but you can also just use a couple of bricks
or pavers too to keep the corn submerged

Step 3:  The cooking of the corn.   Heat your barbeque until really hot and lay the soaking corn on either the plate or grate.   If you have a cover like Fred does then that will decrease the cooking time.   Turn regularly for about 20 minutes.   To watch and see how Fred does it click on the arrow.....

Fred's Waimarama Style Corn Demonstration


If you cannot play the video from the blog then go to this link to see the video on You Tube.

Here is how the corn will look when cooked - sometimes the husks are blackened and
even flame up as they dry out
Step 4:  Cut the stalk end of the corn off and with heavy duty gloves, twist and squeeze the corn out of its husk onto a plate.   It should come out free of all the fibre and be a beautiful yellow.  It helps of course if the corn is as fresh as possible.

Fred's Sweetcorn was particularly good accompanied by a sprinkling of Kelp Pepper
 to reflect the seaside location (and its so full of nutrients)
On the way home to Napier look what was in front of us.....

Beekeeper moving hives near Havelock North

In September 2012 one of my early postings was called "A Vintage Morning Tea - Nan's Pikelets".   Peter's sister Monica was inspired to purchase a modern griddle plate that is caste iron ridged on one side and flat on the other.   It works really well for pikelets because the ridges underneath seem to make the heat disperse evenly - like a simmer pad.   I proudly made Nan's daughters a vintage morning tea using her favourite pikelet recipe. (see earlier post for the recipe).

Nan's Pikelets topped with Gooseberry Marmalade  and a mix of yoghurt and mascarpone  cheese with a touch of honey from The Naked Honey Pot (gorgeous liquid Hawkes Bay honey)

Wednesday, 16 January 2013

Pasta e Basta

Pasta e Basta is a restaurant situated in Amsterdam, in the old part of the city, and is perhaps the most unusual and entertaining restaurant I have been to. No its not the food you go to Pasta e Basta for  - its the waiters. Young students hopeful of a singing career from the Amsterdam Music Conservatorium wait on your table and every now and then break into song singing an Italian aria or a pop ballad.

Maybe it was the Italian arias or the romantic notion of being like an Italian mama making long threads of pasta from my kitchen that influenced my decision to purchase a pasta maker. Two years have passed and I haven't managed to get it out of its box. I decided to gift the Italian pasta maker to my friend Jan.

Imagine my delight when we walked into Jan's kitchen in Christchurch to witness the pasta making in progress and later enjoyed the fresh pasta full of the flavours of summer.

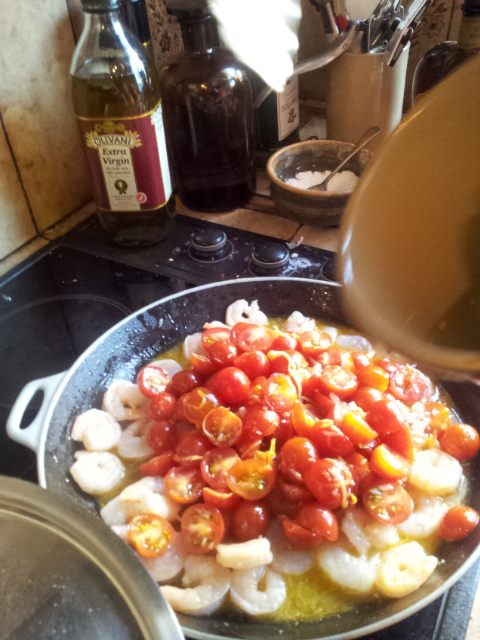
Jan serving up the summer pasta dish featuring shelled prawns tomatoes and basil
Jan had waited for our arrival to complete the pasta making so that she could show me just how easy it is to make pasta. The sauce Jan made is simple, quick and delicious and you can make it as a quick meal idea with commercial fresh or dried pasta.


The pasta has to be hung to set and to keep separated - Jan used a pole between two chairs

You can make pasta out of ordinary flour but to increase your chances of a successful pasta you need to use Italian flours.  Jan used 50/50 Semola (which has the same texture as fine corn meal) with 00 grade very fine Italian flour.

Pasta

For every 100g of flours add one egg - Jan used 200 g of Semola and 200g of 00 Italian flour with four eggs - no salt required as the pasta is cooked in salty water. You can mix the Italian way on a large board or benchtop by hand but Jan used the Kenwood mixer with the dough hook and this saves time and mess. The eggs should be enough for the flours to form a soft dough - if not no more than a flick of extra water is required. You need to sit the dough for at least an hour before rolling. Jan stored the dough in the fridge overnight.

Divide the dough into two and roll out like a thick short pastry

Next process is called booking - you fold over both ends of dough to centre - just like a book!


Set the roller dial at the highest number and wind the handle and roll oout of the dough

After each rolling turn the dial to a lower number 

When the dough is thin enough you can move to the next stage


Thread the rolled pasta through the cutting blade turning the handle and if the pasta sticks sprinkle with extra semola to keep the threads separate

Pasta now hangs on a stick to dry and set and is ready for cooking.  You can also use coat hangers to hang the pasta.

Cut up a packet of cherry tomatoes, add 1 Tbsp of chilli oil and 2 cloves of finely chopped garlic (if you don't have chilli oil just use a chopped chilli or chilli concentrate) with the zest and juice of two lemons.

Set a large pot of water to boil for the pasta and heat another pan with olive oil

Add one pack of raw shelled prawns and stir
 
Add 1 tbsp of salt to boiling water and then gently add the pasta to ensure the water keeps to a rolling boil - the pasta only takes 2-3 minutes to cook. Strain and run over cold water to stop further cooking.

Add the tomato mix to the prawns

Cook a few minutes
 
Chop up a large handful of basil - this magnificent basil is growing in Jan's glasshouse
Serve with layer of pasta, tomato mix and chopped basil.


If you are not fond of prawns you could replace with courgette or eggplant for a summer vegetarian pasta dish and a good finishing touch would be a grating of parmesan cheese.  The courgette and eggplant needs to be cooked longer at a lower temperature. You could also opt to use other fish instead of the prawns.
 
Making pasta does take time but the edible result is much better than what you can buy.  It's an absorbing process to watch and could be part of a social gathering with friends.   Jan was shown how to make pasta and in turn showed me.  I am now passing this on to you in the hope that you might get that pasta machine out of the cupboard, or borrow a friend's machine and give it a go.   I won't be making pasta in the short term but I will certainly make the sauce again. 

Sunday, 6 January 2013

Southern Sushi

I don't know who first called the cheese roll "Southern Sushi" but the title works well because sushi and cheese rolls both take time and care in preparing and rolling.  Describing cheese rolls as "Southern Sushi" also makes locals laugh as they immediately connect with the imagery.   

It's a hard job finding the perfect cheese roll but my Mum (affectionately known as CV) perfected the cheese roll and any major family event usually included 'chomping' cheese rolls.    My sister Kerry has inherited the role of cheese roll maker for Mackay clan gatherings and in turn is teaching our youngest nephew Alex the secret of the perfect cheese roll.
Alex serving some of the toasted cheese rolls (Southern Sushi)
The cheese roll is perfectly suited as a southern comfort food with a buttery crunch outside and a hot cheesy filling that oozes when bitten into.

Kerry has agreed to share the recipe and method with you all.   This time Kerry added grated Mozzarella cheese. Mum would make up to around 500g of grated tasty and a smaller pack of vintage tasty to give extra bite. Kerry has made it easy by buying the pre-grated bags of cheese.

CV's Cheese Rolls
350g grated cheddar  tasty cheese
200g grated mozzarella cheese
100 g vintage sharp cheddar grated
1 tin of Carnation evaporated milk
1 packet of Maggi onion soup
1/2 tsp mustard powder or a pinch of cayenne
Chopped parsley - as much or as little as you like 
Mix together and let sit overnight
2 loaves of sandwich cut bread - ideally, the bread is lightly grained which will roll easily.
Alex with the cheese roll mix watching Kerry do the spread of cheese
Next day cut the left and right sides of bread to assist with rolling.  The cheese mix should be the consistency of porridge - add fresh milk if the mix is too stiff.  Place on an oven tray and butter each slice.  (In winter to make the rolling easier place a roasting dish of boiling water under the tray- this warms and melts the butter into the bread and makes rolling easier).   
Left and right sides of bread trimmed and then buttered
Next turn over the buttered side to face down on tray surface.

Alex turning the buttered bread face down on oven tray


Now, spread the cheese mix onto the centre of bread making sure you leave space around the edges of the bread to allow for spread of mix once melted.
Spreading the cheese mix
The next step is to roll up and store back in bags.   I recorded the action....

(If you cannot view the movie on making cheese rolls, I have included a link to the video on You Tube.)


Cook in a fan oven at 200C turning once to make sure each side browns.
The final turn of the rolls

They take approx 20 minutes to cook.

Kerry made the cheese rolls the day before we ate them and stored them in plastic bags in the fridge overnight. She also made some small packs to leave in the freezer for Alex to enjoy another day.  They do freeze really well and can be cooked from frozen but that will take slightly longer.

Anthropologist, Professor Helen Leach, from Otago University has investigated the cheese roll and it's place in history.  Helen and her colleague found an amazing 140 cheese roll recipe references in Southern community cookbooks dating from the 1930's to the 1990's. I discovered 3 different recipes in a St Peters College, Gore, recipe book from the 1970's.


I remember in the 60's and 70's every cafe in the South offered cheese rolls.  The original recipe was a pre-cooked cheese filling but the recipe we use is as Helen Leach calls it the "convenience food" recipe  where the cheese mix sits for a day and then spread onto the waiting bread.   This was the recipe I also followed when making hundreds of cheese rolls as a school fundraiser in the 90's - there are still plenty of  southern parents making cheese rolls as a dependable fundraiser.

What separates the fundraiser cheese rolls from my Mum's is the quality of cheese and the addition of some grain in the bread.   The real secret is to make sure the rolls are buttered before rolling rather than buttering after cooking.

The cheese roll is only found in the South Island, and is held with affection by Southerners.   The cheese roll has never migrated north - I wonder why not?


Thursday, 27 December 2012

Five Good Things With Gooseberries


Dieter & Sandra's gooseberry bush with boutique hen house in the background
Friends Sandra and Dieter have generously offered me their gooseberries.    Harvesting gooseberries is usually a prickly chore but their property on the flank of Harbour Cone on the Otago Peninsula is a magic place to visit and I love this short season tart fruit.

To reach the gooseberries I feel a little like a kiwi Gretel walking through a charming pathway through manuka woods to arrive in a clearing where fruit trees and two lucky hens live in the cutest hen house.

These lucky hens have a sheltered spot with a wonderful view over to the back bays of the Peninsula.   I couldn't believe one gooseberry bush could have so much fruit.   I got to work accompanied by the cluck of hens and the buzz from a nearby beehive.   What is even better - the gooseberry bush is on a slope so I could easily pick from underneath and avoid those mean prickles.

After gathering a large shopping bag of gooseberries, then its the mundane task of topping and tailing.   Alternatively you can just throw the gooseberries into a bag in the freezer as they freeze free flow and top and tail as you use them throughout the year.   The gooseberries have to be picked green for cooking purposes and for eating leave them to ripen (if the birds don't beat you).   You can also buy red skinned varieties and these I think are the nicest ones to eat raw.
Gooseberries top and tailed


In my September posting I showed you my sister Kerry's espaliered gooseberry with the fruits just forming.   Here is a follow up shot of them after one harvest.   This makes picking even easier and the branches were absolutely laden.   I think this is a great way to deal with the prickly gooseberry bush.

Kerry's espalier gooseberry bush makes picking easy

The Versatile Gooseberry

Here are just some of the things you can make with your harvest:


1.    The Gooseberry Shortcake - this combines the sweetness of the shortcake with the tart bite of the gooseberry.   My Mum used to bribe us into harvesting the prickly gooseberries with the promise of Gooseberry Shortcake.   Mum's secret tip for a perfect gooseberry cake is to avoid putting any sugar on the gooseberries.   The sugar makes a syrup and the cake goes all soggy. You can find this recipe on my posting September 2012 "Gooseberry Shortcake and Sweet Cicely"

Note:   I converted the imperial measurements Mum used to metric.  When I recently followed the metric recipe I found it did need a little extra flour.   Put in the measurement and then add enough flour to make the dough workable on a floured surface.  It should be a very soft dough but it can't be that sticky that you find it difficult to gently roll out with the help of a sprinkling of flour.


Gooseberry Shortcake - a real Mackay family favourite
2. Gooseberries cooked with Elder flowers - Elder flower is the perfect partner to gooseberries, giving the gooseberries a subtle muscat flavour.  Gooseberries make a lot of juice when cooked, so use very little water and to give a creamy flavour cook in a knob of butter and no water.   Remember you can reduce the amount of sugar with the addition of the herb Sweet Cicely. To make this into a sweet sauce excellent for going over pancakes - just puree in either a food processor or that wonderful invention the stick mixer. 

Gooseberries cooked with Elder flower blossoms and Sweet Cicely to aid the sweetening

Gooseberries after cooking
3.  Gooseberry Chutney-   I have never used gooseberries as a chutney before so I searched the blogosphere for the best sounding recipe.   I found two that I decided to try.   One included vinegar and spices connected to Christmas, the other was an Indian chutney with no vinegar and Bengali spices.
Spiced Gooseberry Chutney by Chef Heidi Fink


Peter's preferred chutney was the one with Bengali spices 
Gooseberry chutney with Bengali Spice by the Hungry Tigress

This chutney doesn't have vinegar and not that much sugar so once open it will probably only last a week or two in the refrigerator.   To keep good until opened, I followed instructions and finished the jars off in the oven making sure there was a good seal.   The Gooseberry Chutney with Bengali Spice was the one chosen by my pickle connoisseur husband Peter as the better of the two.

Both these blogs have excellent ideas so I have supplied the links to the recipes to give you the opportunity to go exploring these blogs over the Christmas holidays.


4.  Gooseberry & Orange Jam - I shared some of my gooseberry bounty with my neighbour Rob and next thing he turns up at my door with a jar of Gooseberry and Orange jam.  He found the recipe in "The Times Cookery Book" by Katie Stewart, published forty years ago in 1972.
Rob's Gooseberry & Orange Jam with The Times Cookery Book 


 Gooseberry and Orange Jam
Makes 2 kg 700g and takes 1 hour.

1 kg 350g green gooseberries
430 ml water
rind and juice of 2 oranges (Rob used tangelos which gives the jam more tang)
1 kg 600 g granulated sugar

Rinse the gooseberries, and top and tail them.   Place in a large saucepan or preserving pan, and add the water, finely grated orange rind and juice.   Bring slowly to boiling point and simmer gently, squashing the fruit occasionally with a wooden spoon.   When the fruit is quite tender (about 30 minutes) add the sugar.  Stir over low heat until sugar has dissolved.  Bring up to the boil and boil briskly for a set (takes about 10 minutes).   Draw off the heat, skim and then spoon into six clean warm jars.   Cover and seal while hot.

 
5. Gooseberry & Elder Flower Fool - This is a simple and most delicious way of enjoying the flavours of Gooseberry.    It can be made in a moment if you have already prepared the fruit.   You don't want it to be too watery.   If you don't have elder flowers to hand you can simply add some elder flower cordial.
I presented the Gooseberry Fool in a Temuka coffee cup with my New Zealand shortbread
and a sprig of elder flower
You can make a fool with all cream, or a mix of cream and thick yogurt, or with a mix of custard and cream.  Play around with the combination you like the best.   I used two-third cream and one-third yogurt because the fruit is quite tart.  If the fruit was sweeter I would have gone 50/50.
Simply beat up the cream until thick and doesn't drop off the beater.   Next fold in the yogurt or custard and then the fruit puree.  You can use any fruit for this but tart fruit is best.  Blackcurrant or rhubarb fool is also good.  You need to allow it to chill well before serving.   It's a lovely dessert to have on a hot summer's evening.

Glossy, sweet Strawberries from Dieter's Glasshouse
It's now towards the end of the gooseberry season here.   The gooseberry is stepping aside for delicious strawberries, currants and raspberries.   Dieter has his strawberries growing in large black pots.   I think this is something I might try because many of my strawberries get eaten or rot if the ground is too wet.   Picking the strawberries hanging over the edge of the pot make for easy and perfect pickings....just like Kerry's espaliered gooseberries. 

Thursday, 13 December 2012

Southland Watermelon and Bottled Central Otago Apricots

It's time for me to announce that this Southern cook and gardener is heading North. Peter and I are embarking on a new adventure in Auckland for at least a year. I am looking forward to having easy access to citrus, avocados, tamarillos, kiwifruit, and to grow tomatoes and basil outdoors!

There will be Southern fruit and vegetables that I will miss like Oamaru new potatoes, gooseberries, black and red currants, and Central Otago stone fruit, particularly apricots and cherries.

But there is one southern vegetable that is often overlooked or even disliked....the swede.  Much to Peter's embarrassment, I have been known to pick up a swede from the trailer selling them at the airport to take up north as a gift.

I like swede and even though it's not seasonal, I am going to feature it because I will miss it next winter and was reminded of it recently in a jewellery gallery.


Southern Watermelon, aka the Swede

Swede by David McLeod from 5+ a day series (Copper & Silver)
The swede, originally called the Swedish Turnip, and Rutabaga in the US, is actually a cross between a turnip and cabbage and is on the list of aphrodisiac foods (who would have believed that?)  

We down here jokingly call it "Southland watermelon". You could never compare a supermarket swede to a watermelon.   But imagine it's a winter morning in Southland, one of those mornings when you can see your breath.   A swede is plucked from the frost chilled soil, and deftly peeled by a farmer  skinning the swede of its earth and roots. You are handed a slice and may well be surprised by it's sweet melon like quality.  If you ever have the opportunity, go on, give it a try.

The swede, if fresh, is lovely grated raw into a salad.  Make sure it's late enough in the season to have had at least one good frost to concentrate the sugars. The swede stores well and if you manage to obtain some that haven't had all their roots trimmed, you can pop them back into the garden soil to keep even longer in nature's fridge.

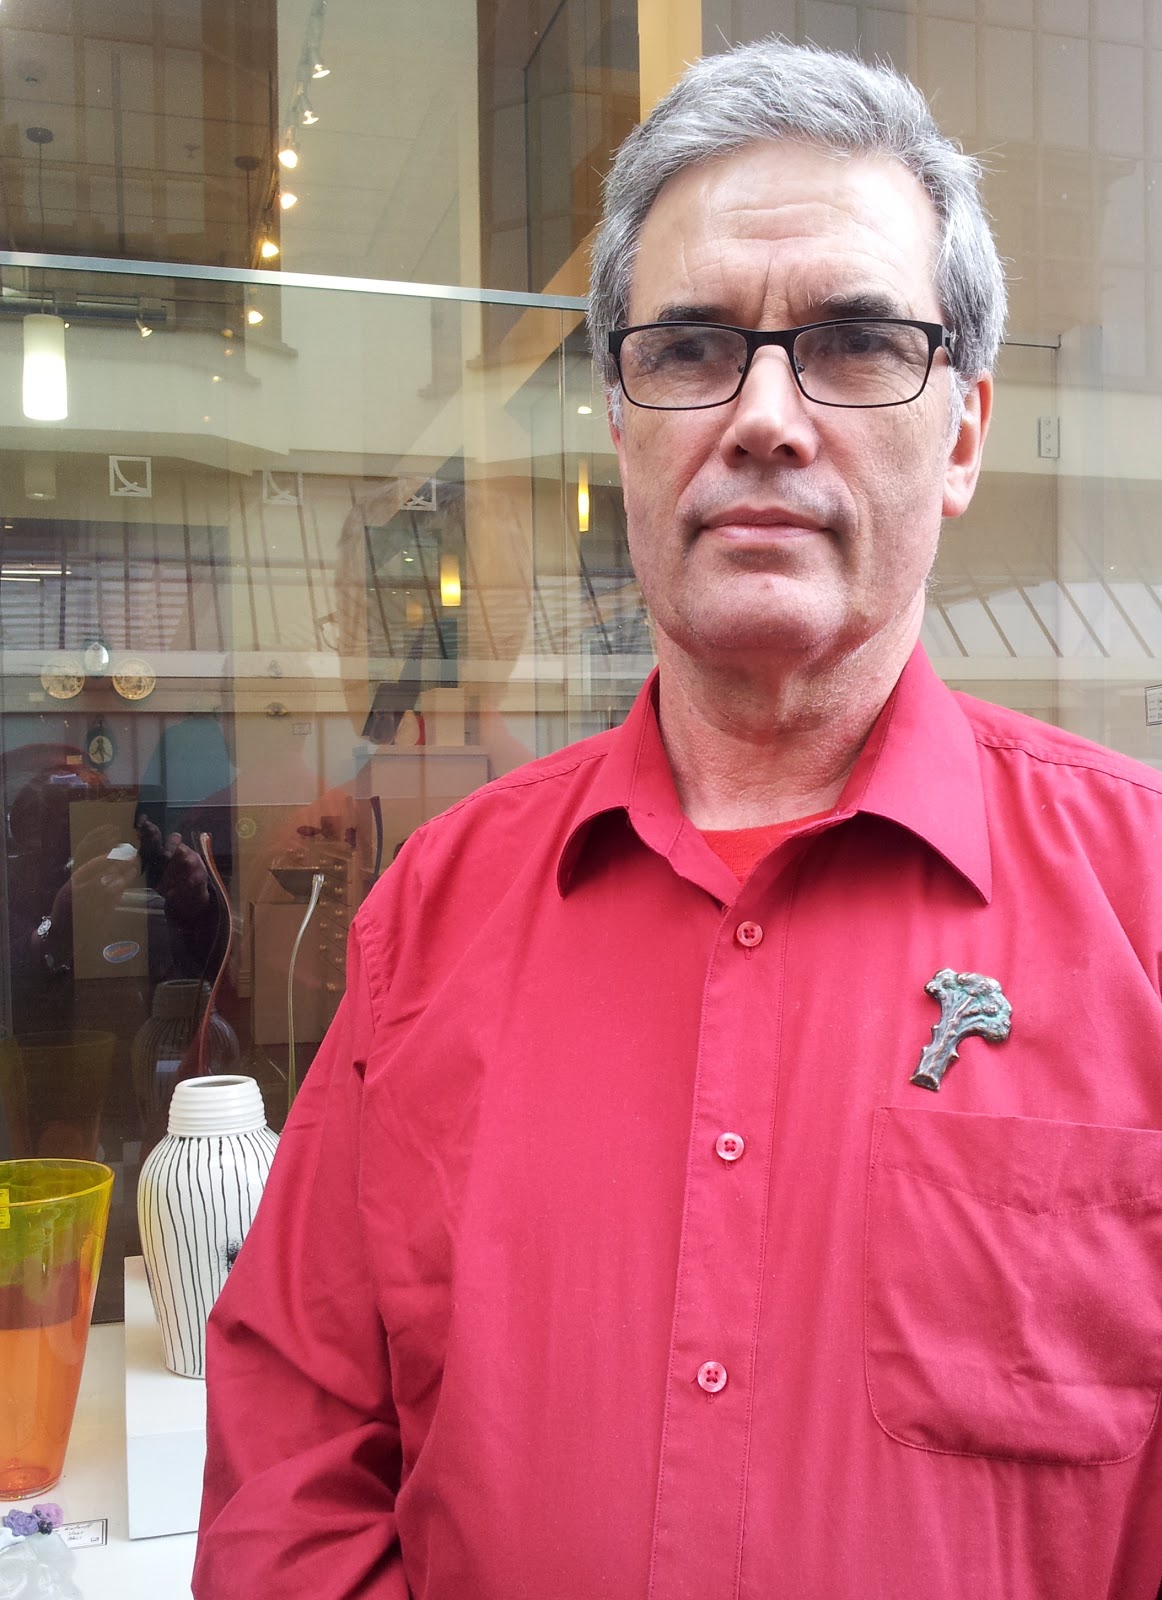
David McLeod from Quadrant Gallery - Jewellery,
Glassware and Ceramics, Moray Place, Dunedin
I have a great Friday job working at Quadrant Gallery in Moray Place, Dunedin, with owner and jeweller David McLeod. Dave loves gardening. I bet there are not many jobs where your boss brings you lunch, and better still it's substantially made from his garden produce. He has even made jewellery inspired by vegetables.

I have asked Dave to be a guest recipe blogger with a Swede recipe from his sister.  You can store it away until next winter.


Broccoli Tree from David McLeod's Five+ a day series
Nana's Big Tomato - by David McLeod from his Five+ a Day series - silver and garnet
(this piece was based on a drawing his daughter Islay did when she was 5)

Allannah's Grated Swede

Framed Swede  - Five+ a Day series- Sterling silver
and Copper
Peel and cut into pieces that can easily be grated.
Finely chop an onion.
Melt a knob of butter in a pan, and saute the onion until golden.
Add 1 tsp of turmeric and caraway seeds (to taste -perhaps 1/2 tsp)
Then add the grated swede and cook until soft.

Dave suggests this is a great dish to serve with lamb and a salad.


I haven't been able to try this recipe out yet but I like the idea of using turmeric and caraway to give a hint of the exotic to the humble swede.   I would also be tempted to try a little chili as well.
Grating the swede is inspired because it can take quite a while to cook in pieces.


Bottled Central Otago Apricots  

Gus's preserved Sundrop organic apricots 
One thing I will definitely miss will be preserved apricots made by our son Gus. They taste like bottled Central Otago sunshine.

Gus put his preserving prowess to the test when he entered his apricots into the bottled fruits section of the Wanaka A&P Show this year.  He won first prize. Unfortunately they don't run to ribbons these days and the $5 prize money isn't quite the same thrill.    

The key to Gus's success, as with most good food, is sourcing the best fruit he can. He has found an organic grower who grows the apricot    varieties Sundrop and Vulcan.

He produces around 100 jars of apricots each summer using the familiar Agee jars that my mother would have used (1 litre capacity).   All the apricots are processed in a commercial kitchen and he is set to do his 2013 bottling batch late January.

Gus is selling the 20 bottles he has left from his 2012 bottling.

If you would like to buy these prize winning apricots or make an order for the 2013 season you can contact Gus by email: Augustin_hayden@hotmail.com  They cost $22 each ($20 if you can offer a replacement Agee Utility jar.)

Apricots are an excellent source of vitamin A that doesn't get destroyed through cooking. 

Perhaps I can convince Gus to do another guest blog featuring his preserving method late January.
Watch out for my next posting on the different things you can do with another of my favourite southern fruits, the gooseberry.