
It's been a very special week at our house with Peter and our friend Rod Morris launching their book "An Extraordinary Land". We are heading down to Dunedin for two events to launch the book in the south. It's most fitting that this week I give you a taste of our other home, where our family grew up, the Otago Peninsula
 |
Top left: An Albatross's stretching its wings at the Royal Albatross Centre
(wingspan equals length of a mini), Top right and bottom left: yellow eyed penguins are
shy of people and the best close up view is at Penguin Place; bottom left furseal pup at
Natures Wonders Photos courtesy of Tourism Dunedin
|
The Otago Peninsula is a perfect eco-tourism travel destination and has enabled Dunedin to be called "The Wildlife Capital of NZ". Unlike us; the seals, yellow-eyed penguins, little blue penguins, fur seals and sealions enjoy a good cold day. An albatross requires wind for lift off.
To enjoy being in touch with nature on the Peninsula you should come prepared for some vigourous weather.
Don't let that put you off...there are lots of spectacular clear sunny days too!

From the road coming into Broad Bay taken July 2012
One resident, not connected with wildlife, but firmly connected to the history of the Peninsula undertook a massive challenge. Had Margaret Barker not driven up to Larnach Castle in a combi van in the 1960's, and saw it was for sale it may not be here today. Rumour has it another bidder had plans to pull it down. Margaret and her family have over the years transformed the rundown mansion into one of NZ's top tourist attractions.
Larnach Castle for tea
To enjoy being in touch with nature on the Peninsula you should come prepared for some vigourous weather.
Don't let that put you off...there are lots of spectacular clear sunny days too!
From the road coming into Broad Bay taken July 2012
One resident, not connected with wildlife, but firmly connected to the history of the Peninsula undertook a massive challenge. Had Margaret Barker not driven up to Larnach Castle in a combi van in the 1960's, and saw it was for sale it may not be here today. Rumour has it another bidder had plans to pull it down. Margaret and her family have over the years transformed the rundown mansion into one of NZ's top tourist attractions.
Don't let that put you off...there are lots of spectacular clear sunny days too!
 |
From the road coming into Broad Bay taken July 2012
|
Larnach Castle for tea
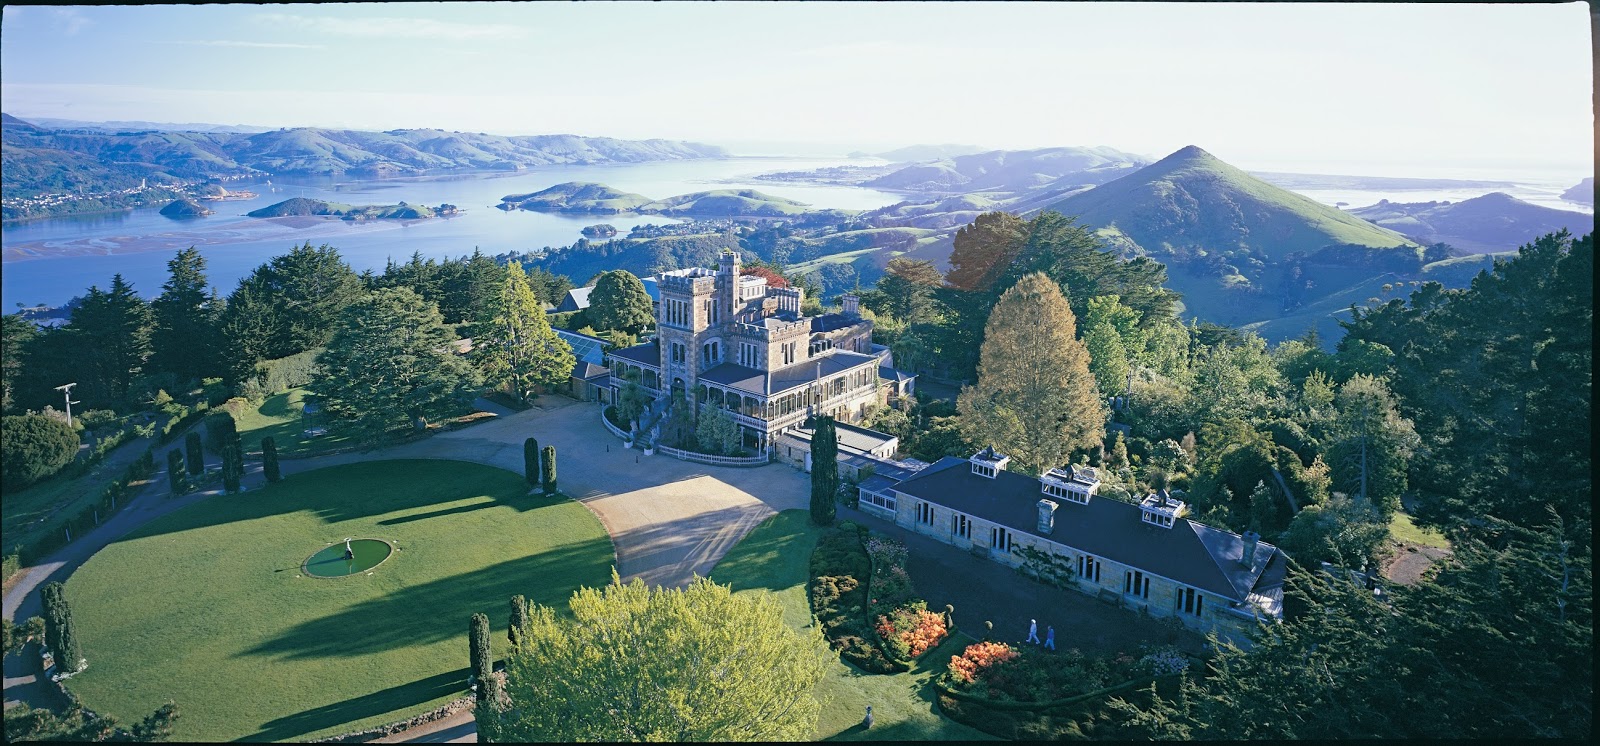 |
This great photo by Andris Apse is courtesy of Tourism Dunedin. It shows
the wonderful vantage point Larnach Castle has of the Otago Peninsula.
|
I love to visit the castle for its garden; recognised as a "Garden of International Significance". It's a great credit to the vision and years of work by Margaret and the green fingers of her head gardener Fiona Eadie. I am a fan of Fiona's garden philosophy. I first heard her in an interview on Radio NZ National .
Stay all day for a garden entry price of $12.50, and if you visit Dunedin regularly it pays to purchase a Garden Pass for $20 per anum so that you can enjoy the garden's stunning seasonal changes.

With garden entry you can access the ballroom where the cafe is situated.
 |
| Larnach Ballroom chandelier |
It's not often you get to sit in an elegant ballroom beside a warming open fire, beneath a massive chandelier, while sipping tea and eating scones with jam and cream... you can at Larnach Castle.
Until you get the opportunity to come south...why don't you try your hand at making scones for friends and family?
Until you get the opportunity to come south...why don't you try your hand at making scones for friends and family?
My Favourite Scone Recipe
My first memories of scones was Mum filling a giant basket of halved scones topped with homemade raspberry jam to take down to the woolshed for the shearers 10 o'clock smoko.
 |
| My sister Kerry sent me this after our visit to Larnach Castle grounds and cafe |
I have heard baristas need to make 1000 coffees before they make the perfect cup. It doesn't take that long to make the perfect scone but it does take practice and just like making coffee there are some tricks to the ancient art of scone making.
I came by this recipe from my Mum. Its not her family recipe but she gave me the coffee mug that had Peta Mathius's Dad's scone recipe. I tried it one day and found it to be good - a little more butter than Mum's recipe (naughty but nice). So here is Harvey's Scone recipe:

2 cups plain flour, 4 tsp baking powder, 100g butter, and a little milk to mix.
400 F is around 200 C.
It seems like a lot of baking powder but you need to have this much to get the dough to rise quickly.
First secret - make sure the butter is cold as you do with pastry. Chop into small cubes. If time is short then you can cheat by using a food processor to mix butter and flour, but to get the best melt in the mouth scones mix the ingredients by hand. The same rule applies to pastry. The result is that you end up with tiny butter pieces in the dough, which melt during cooking to create a special lightness.

My Mum used to make a pile with the flour on the bench and then finely cut in the butter with a knife. A pastry cutter would do the job well too.
 |
| Cut as you would finely cutting parsley |
She would finish the job by rubbing the butter through her hands, squashing any lumps into the flour.

Scoop up the butter and flour mix, put into a bowl, add the baking powder - mix in well (by hand).
Next add the milk. Start with 1/2 a cup of milk and add more as you need it. It's no good giving exact measurement for milk as it will depend on the flour as to how much liquid is needed to make a dough.
You can tell by eye. If you have butter milk in the fridge, use it instead of regular milk and it will make an even better scone.

Mix in the liquid with a table knife and try to make the dough with as few strokes as you can. Too much handling will make your scone tough. I best describe the action as first folding over with the blade of the knife and cut through to mix.
 |
| A table knife tends to stop you stirring the dough |
Sprinkle flour onto your bench or large board. Turn out the dough. It should be damper than you would prepare for pastry. It doesn't matter if it's rather sticky as you can roll it in flour to make it easier to handle. Mould it gently into a flat ball shape with your hands.

Gently roll with not much pressure to say 3 cm or 1 inch depth. Shape and cut into pieces.
 |
| You can still see pieces of butter in the dough. |
Flour a tray and brush the tops with milk. They only take 10-12 minutes in a hot oven around 200C.
I do the traditional thing of wrapping them in a tea towel while hot. This kind of steams them.
 |
Scones are best eaten with homemade preserves and for an extra treat some beaten cream. Ideally still warm from the oven. Your guests will love them!
 |
| Scones straight from the oven served with Feijoa and Guava jelly. |
Probably 80% of the time I use a food processor to mix scone flour and butter, and that's because scones are something you can make really quickly if visitors drop in unexpectedly. However, the"taste panel" here really loved the scones I made the old fashioned way. If you have time, I think hand rubbing flour and butter is the way to make the perfect scone.
Peninsula Wildlife
In the 1930's scones would have been a regular part of morning or afternoon tea. Agnes Richdale, wife of ornithologist Dr Lance Richdale, would have been hard pressed to find the time for scone making. Agnes was his research assistant in the field but also typed up pages and pages of his research notes on the Royal Albatross and Yellow Eyed Penguins on the Otago Peninsula.
Royal Albatross had never successfully bred at Taiaroa Head, until Dr Richdale pressured city leaders to protect the colony from vandals. Lance and Agnes worked tirelessly to ensure that albatross could succesfully raise chicks. In 1938 they were rewarded with the first born chick at Taiaroa Head taking off on 3 metre wings to begin its life in the Southern Ocean.

This is a frame from an 8mm film that Lance Richdale made in 1939 that can be
watched at the Albatross Colony.
Agnes Richdale is weighing the albatross chick dressed rather elegantly for the task
Seventy years later, in 2007, the Royal Albatross Centre celebrated the 500th chick born at the colony. The best time to visit is between December and February when there is an adult on the nest with the chick.
Richdale also did pioneering research on the yellow eyed penguin at a time when there were lots of breeding pairs on the Peninsula.
In the mid 1980's it was a different story. Breeding pairs were decreasing in numbers. This decline was noticed by sheep farmer Howard McGrouther. Being a practical farming man Howard decided to give the penguins a helping hand.

A yellow eyed penguin with its chick and A-frame shelter at Penguin Place
He constructed A-frame houses for the penguins to nest in so they only had to defend predators on one front. He had given the penguins on his property a good fighting chance against stoats and cats.

The late Howard McGrouther feeding a penguin some
fish at the penguin hospital he set up for penguins that were
underweight and needing building up to survive out at sea.
(Photo: Craig Baxter)
To fund this conservation work, he created Penguin Place. Guided tours take you really close to the secretive penguins through a series of trenches (an idea of Howards to keep people down at penguin height).
Next to the Albatross Centre lives another farmer Perry Reid. Perry is passionate about conserving the wildlife on his property for future generations. He has fenced off a large area of the farm, is doing predator control work and replanting native vegetation. All this work is to protect local wildlife including the yellow eyed penguin, little blue penguin and a seal breeding colony.

At the photo vantage point - that's me at the back on the left
and Perry Reid right.
When you visit Natures Wonders - a fun-filled tour over his farm in an all-terrain vehicle, you can see the great results of his vision and his labour. Visiting the seal colony was a highlight for me as the pups are so darn cute. On a clear day there are spectacular views along the coastline and up the harbour to the city.
Probably 80% of the time I use a food processor to mix scone flour and butter, and that's because scones are something you can make really quickly if visitors drop in unexpectedly. However, the"taste panel" here really loved the scones I made the old fashioned way. If you have time, I think hand rubbing flour and butter is the way to make the perfect scone.
Peninsula Wildlife
In the 1930's scones would have been a regular part of morning or afternoon tea. Agnes Richdale, wife of ornithologist Dr Lance Richdale, would have been hard pressed to find the time for scone making. Agnes was his research assistant in the field but also typed up pages and pages of his research notes on the Royal Albatross and Yellow Eyed Penguins on the Otago Peninsula.
Royal Albatross had never successfully bred at Taiaroa Head, until Dr Richdale pressured city leaders to protect the colony from vandals. Lance and Agnes worked tirelessly to ensure that albatross could succesfully raise chicks. In 1938 they were rewarded with the first born chick at Taiaroa Head taking off on 3 metre wings to begin its life in the Southern Ocean.
 | ||||
This is a frame from an 8mm film that Lance Richdale made in 1939 that can be
watched at the Albatross Colony.
Agnes Richdale is weighing the albatross chick dressed rather elegantly for the task
Seventy years later, in 2007, the Royal Albatross Centre celebrated the 500th chick born at the colony. The best time to visit is between December and February when there is an adult on the nest with the chick.
Richdale also did pioneering research on the yellow eyed penguin at a time when there were lots of breeding pairs on the Peninsula.
In the mid 1980's it was a different story. Breeding pairs were decreasing in numbers. This decline was noticed by sheep farmer Howard McGrouther. Being a practical farming man Howard decided to give the penguins a helping hand.
He constructed A-frame houses for the penguins to nest in so they only had to defend predators on one front. He had given the penguins on his property a good fighting chance against stoats and cats.
To fund this conservation work, he created Penguin Place. Guided tours take you really close to the secretive penguins through a series of trenches (an idea of Howards to keep people down at penguin height).
|


Next to the Albatross Centre lives another farmer Perry Reid. Perry is passionate about conserving the wildlife on his property for future generations. He has fenced off a large area of the farm, is doing predator control work and replanting native vegetation. All this work is to protect local wildlife including the yellow eyed penguin, little blue penguin and a seal breeding colony.
 |
At the photo vantage point - that's me at the back on the left
and Perry Reid right.
|
When you visit Natures Wonders - a fun-filled tour over his farm in an all-terrain vehicle, you can see the great results of his vision and his labour. Visiting the seal colony was a highlight for me as the pups are so darn cute. On a clear day there are spectacular views along the coastline and up the harbour to the city.
Allans Beach
One of my favourite things to do is to walk the length of Allan's Beach to where Hoopers Inlet meets the sea. It's a revitalising thing to do and it's absolutely free. It's the only Peninsula beach where people can take their dogs. There's a good chance you'll meet sealions sleeping on the sand. You can see penguin tracks sometimes but you seldom if ever see them.
You just have to remember the rule - don't get between large sealions and the sea. Keep your distance. They do look flabby and slow but they can move deceptively fast.
You just have to remember the rule - don't get between large sealions and the sea. Keep your distance. They do look flabby and slow but they can move deceptively fast.
 |
| Photos I have taken at Allens Beach: top left a sealion posing; top right, the end of the beach where the inlet meets the sea; and my lovely niece Jessie enjoying the fresh sea breeze. |
I take snapshots but Rod Morris takes photos....
 |
| Tui getting nectar from a kowhai flower from "An Extraordinary Land" featuring 12 essays on New Zealand's unique natural stories by Peter Hayden and over 250 photographs from wildlife photographer and naturalist Rod Morris. |


